Drum Set Miking Field Guide
A companion to the Microphone Field Guide — how to choose and place microphones on a drum set, built around the microphones we actually have.
How this page was made. I assembled this guide with Claude as a writing and drawing partner. The equipment is either my own or UCF’s; the explanatory text and the diagrams were drafted with AI assistance, and I reviewed and edited the result. There’s a fuller note at the bottom of the page.
Before you touch a microphone stand
A drum set is not seven instruments that happen to sit near each other. It is one instrument, played by one person, and it already has a balance — the one the drummer creates with their hands and feet. Your job is to capture that balance, not to rebuild it from parts.
This has a practical consequence that beginners almost always get backwards:
The overheads are the recording. The close mics are seasoning.
If the overhead pair alone doesn’t sound like a drum kit you’d want to listen to, no amount of close-miking will rescue it. Get the overheads right first, with everything else muted. Then add close mics only where the overheads leave something missing — which is usually the kick, often the snare, and less often than you’d think the toms.
The corollary is uncomfortable but true: the kit’s tuning and the drummer’s touch matter more than your microphone choice. A well-tuned kit played musically through a $119 AT2020 will beat a badly tuned one through the Schoeps. Before you spend an hour on placement, spend ten minutes listening to the kit in the room and asking whether the snare rings, whether the kick is choked or boomy, whether the cymbals wash over everything. Fix what you can at the source.
The two problems you are actually solving
Everything below is in service of these two. If you understand them, most placement decisions answer themselves.
Problem 1 — Arrival time
Sound travels roughly one foot per millisecond. When the snare reaches the snare mic at six inches and the overheads at four feet, those two copies arrive about three milliseconds apart. Summed, they comb-filter: some frequencies reinforce, others cancel. This is not a subtle effect — it is the difference between a kit that sounds solid and one that sounds hollow and small for reasons nobody can name.
Two tools manage it.
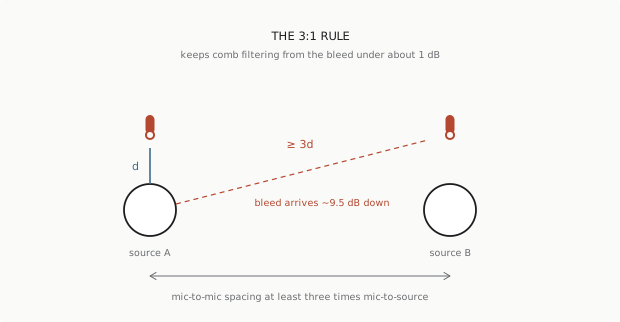
The 3:1 rule. Keep the distance between any two microphones at least three times the distance from each mic to its own source. The bleed then arrives roughly 9.5 dB quieter than the direct sound, which holds the resulting comb filtering to about 1 dB — inaudible in practice. It is a rule of thumb, not physics, and coincident pairs like XY deliberately break it (two capsules in the same place have no arrival-time difference to filter). But on a drum kit, where you are spacing close mics around a small area, it is the single most useful number to carry in your head.
Equidistance. Where you cannot satisfy 3:1 — and on a drum kit you often cannot — make the distances equal instead. If both overheads are exactly the same distance from the center of the snare, the snare arrives at both at the same instant, so it sits dead center in the stereo image and sums cleanly. This is the entire basis of the Glyn Johns and Recorderman techniques below, and it is worth measuring rather than eyeballing. Use a mic cable: hold one end at the center of the snare, stretch to the first mic, pinch the cable, then swing it to the second and move that mic until it matches.
Problem 2 — Bleed
Every mic hears every drum. You cannot prevent this and you should stop trying to — some bleed is what makes a kit sound like a kit. What you can do is choose which bleed you get, and the tool for that is the polar pattern’s null, not its front.
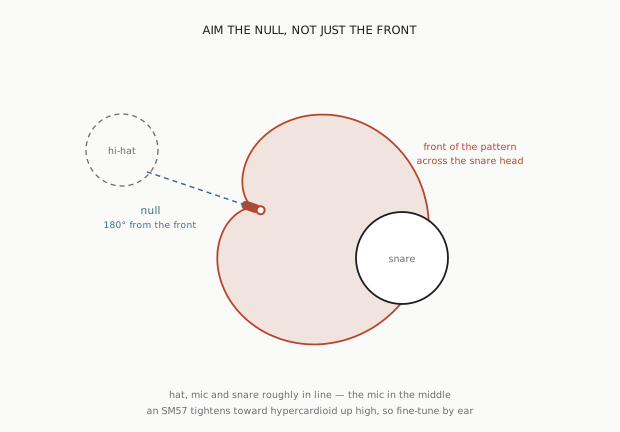
The Microphone Field Guide makes this point in the abstract: a cardioid is deafest at 180°, so experienced engineers aim the null rather than the front. The snare mic is the canonical case. The hi-hat is the loudest thing nearest the snare, and it is the bleed most likely to ruin a snare track — thin, splashy, and impossible to gate cleanly. So place the snare mic so that the hi-hat, the mic, and the snare sit roughly in a line with the mic in the middle: front across the snare head, back toward the hat.
A wrinkle worth knowing. An SM57’s pattern narrows toward hypercardioid at high frequencies, so its deepest rejection up where the hi-hat lives is not quite at 180°. Set the angle by geometry, then fine-tune it by ear while someone plays the hat — a few degrees of rotation can buy several dB. If the spill is still unmanageable, a figure-8 has a deeper, more consistent null; our C414s and RNR1s can do that.
Part 1 — Read the room first
The room decides how much of this guide applies. Before choosing a single microphone, stand where the mics will go and listen.
The clap test. Stand near the kit and clap once, hard. A quick, dry tick with no tail is a small dead room. An audible ring that rises in pitch is flutter echo between parallel walls. A smooth decay of a second or more is a live room, and a gift.
| Small / dead | Medium / treated | Large / live | |
|---|---|---|---|
| Strategy | Close mics carry the sound | Overheads carry it, close mics fill | Overheads and room carry it |
| Overhead height | Lower, 2–3 ft above cymbals | 3–4 ft | 4 ft and up |
| Overhead pattern | Cardioid — reject the walls | Cardioid or wide cardioid | Omni becomes viable and lovely |
| Room mics | Skip them; you’d only capture boxiness | Optional, as a blend | Essential — often the best track |
| Minimal techniques | Struggle here | Workable | Where they shine |
| Channel count | More | Middle | Fewer can be better |
Cheap fixes that beat expensive microphones. Move the kit off the wall and out of the corner. Put something absorptive on the nearest parallel surface. Put a rug under the kit. If the room rings, try the kit in a different spot before you try a different mic — a move of three feet often does more than an upgrade.
Part 2 — The channel ladder
Channel count is a choice, not a given. Each rung below is built only from microphones in our inventory, and each one gains you something and costs you something. Work up the ladder, not down it — start with the fewest mics that could work and add only when you can say what the addition is for.
One microphone
One mic, waist to chest height, three to four feet in front of the kit, roughly facing the center. Move it until the balance is right — that is the whole technique, and it is entirely a matter of walking the mic around while someone plays.
- Reach for: the sE RNR1. Its figure-8 pattern puts a null at the sides, which lets you angle the rear lobe toward or away from the room to taste, and its extended top end means cymbals don’t turn to mush. AKG C414 in cardioid is the alternative if the room behind is unhelpful.
- Gains: no phase problems of any kind. Impossible to make incoherent.
- Costs: no stereo, no control after the fact. The mix is the mic position.
- Use when: the room is good, the drummer is good, and the track wants the kit to sit as one thing rather than dominate.
Two microphones
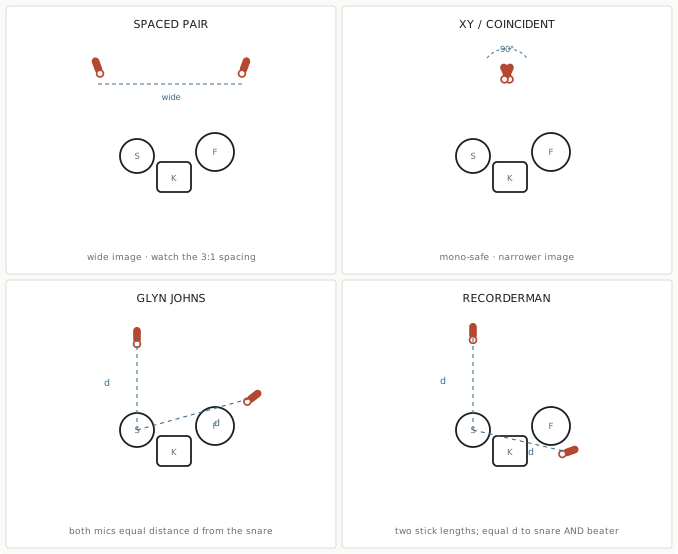
Recorderman. Measure two drumstick lengths (about 40 inches) from the center of the snare. Put mic one directly above the snare at that distance, pointing down. Put mic two over the drummer’s ride-side shoulder, the same distance from the snare. Then check both against the kick beater with a cable and adjust until they match there too. Both mics equidistant from both snare and kick puts each dead center and in phase.
- Reach for: the Røde NT5 matched pair, or the sE RN17 pair for more detail.
- Gains: stereo width, a centered snare and kick, and a balance close to what the drummer hears.
- Costs: the kick will want reinforcement in most rooms.
Spaced pair. Simpler and wider — two mics above the kit, three to four feet apart, both aimed down. Watch the 3:1 spacing relative to their height, and still check the snare distances.
Three microphones — Glyn Johns
The one that teaches the most. Mic one goes three to four feet directly above the snare, pointing down. Mic two goes just outside the floor tom, about six inches above the rim, looking back across the toms toward the snare and hat. Both must be exactly the same distance from the center of the snare. Add a kick mic and you’re done.
- Reach for: NT5 pair or RN17 pair overhead, Shure PG52 on kick.
- Gains: a genuinely wide, natural kit image with a strong floor tom and a centered snare, from three channels.
- Costs: very sensitive to that equidistance. Get it wrong and the snare smears. The hi-hat can dominate if mic two is aimed carelessly.
- Note: the asymmetry is the point. This is not a symmetrical stereo pair, and it will not behave like one.
Four microphones
Glyn Johns plus a snare mic, or the more conventional kick + snare + overhead pair. This is the first rung where you have real control in the mix.
- Reach for: PG52 kick, SM57 snare, NT5 pair overheads.
- Fits the Sound Devices MixPre-6 II exactly — four XLR inputs, records to its own SD card, runs on batteries. The whole session needs no computer.
- Gains: snare and kick level become mix decisions rather than placement decisions.
- Costs: you now have phase relationships to check. Start here with polarity.
Seven or eight microphones — the full kit
| Ch | Microphone | On |
|---|---|---|
| 1 | Shure PG52 | Kick, inside |
| 2 | Solomon LoFReQ | Kick, outside — sub weight |
| 3 | Shure SM57 | Snare top |
| 4 | Shure PG56 | Rack tom 1 |
| 5 | Shure PG56 | Rack tom 2 |
| 6 | Shure PG56 | Floor tom |
| 7 | Røde NT5 | Overhead L |
| 8 | Røde NT5 | Overhead R |
This fills the Rupert Neve RMP-D8 exactly — eight channels, and the PGDMK6 kit supplies six of the eight. Substitute the PG81 pair for the NT5s and the whole plan comes out of one drum mic case.
- Gains: full control. Every element is adjustable after the fact.
- Costs: eight sources of phase trouble, and a strong temptation to mix from the close mics and end up with something that sounds like a sample library instead of a drum kit.
- Discipline: build the mix from the overheads up, exactly as if you had recorded the two-mic version, and bring close mics in only until they do their job.
Part 3 — Drum by drum
Kick
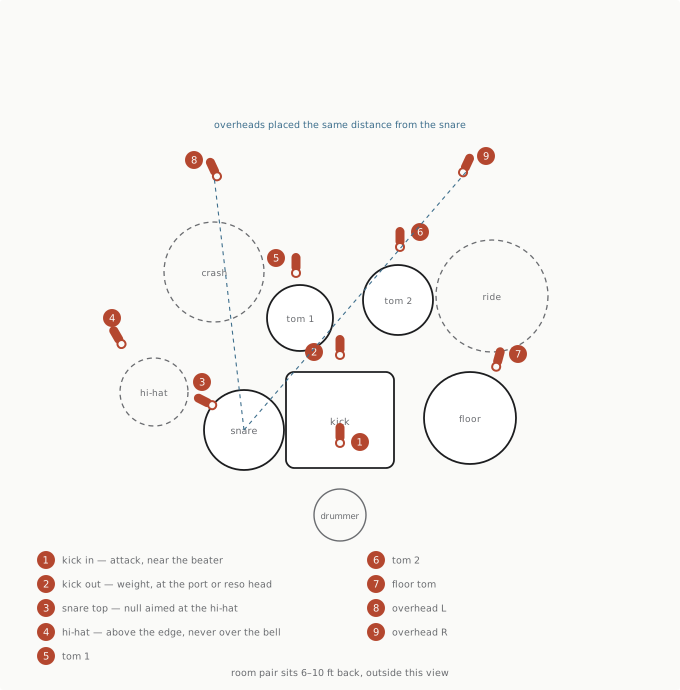
The kick has two sounds in it and they live in different places. Attack is at the beater. Weight is at the resonant head and in front of the drum.
| Position | Sound | Use |
|---|---|---|
| Inside, 2–3 in from the batter head, aimed at the beater | Maximum click and attack | Dense music where the kick must cut |
| Inside, halfway, aimed slightly off-center | Balanced | The safe default |
| At the port or just outside the reso head | Fuller, rounder, more of the drum | Jazz, orchestral, anything needing less click |
| 1–3 ft outside, on axis | Low end and room | Blend underneath, rarely alone |
- Reach for: the PG52 — it exists for this job and its response is already shaped for a kick drum.
- Add weight with the LoFReQ. Place it a few inches off the reso head. It captures almost nothing above 2–3 kHz, so it is useless alone and excellent blended under the PG52. Check polarity when you combine them — two mics facing each other through a drum are usually opposite, and flipping one is often the single biggest improvement in the whole session.
- Common mistake: burying the mic in pillows until the drum has no tone left. Start with less damping than you think you want.
Snare
- Reach for: the SM57, one to two inches above the rim, angled down across the head toward the center, with the back of the mic toward the hi-hat as described above. This is the default for good reason.
- Alternative: an RN17 or AT2021 if you want more stick detail and the room is quiet enough to afford the extra sensitivity.
- Height matters more than people expect. Closer gives more body and more proximity effect; further back gives more of the whole drum and more bleed. One inch of movement is audible.
- Bottom snare mic: optional, catches the wires. If you use one, flip its polarity — it faces the opposite direction, so it is inverted relative to the top mic by definition. Not flipping it is the classic error, and it hollows out the snare.
Hi-hat
- Reach for: a PG81, NT5, or RN17 — a small-diaphragm condenser, four to six inches above the outer edge, aimed down and slightly outward, away from the snare.
- Never over the bell, and never in the path of the air that puffs out when the hats close. Both produce a harsh, unusable track.
- Often unnecessary. The hi-hat is already in the overheads and the snare mic. Add this channel only if the part genuinely needs it.
Toms
- Reach for: the PG56 trio — they come with rim clamps, which is what makes them practical.
- One to two inches above the rim, angled down across the head toward the center. The same geometry as the snare.
- Watch 3:1 between toms, and check each tom against the overheads for polarity.
- In a good room, consider skipping them. Toms in the overheads often sound bigger and more natural than close tom mics, and three fewer channels is three fewer phase relationships.
Overheads
This is the most consequential decision on the page.
| Pair | Character | Best for |
|---|---|---|
| Røde NT5 | Neutral, reliable | The everyday default |
| sE RN17 | More detail and air | When cymbals matter |
| AKG C414 XLII | Most flexible — nine patterns | XY, wide cardioid, or omni in a good room |
| Earthworks TC20 | Flattest, fastest, omni | A good room; no proximity effect, so you can get closer |
| Schoeps MK21 | Wide cardioid | Some room in the sound without going omni |
| Schoeps MSTC 74 | Fixed ORTF, one stand | When you want the geometry guaranteed correct |
| Royer SF-12 | Coincident Blumlein, one body | A live room, and a gorgeous mono fold-down |
- Height sets the ratio of cymbals to drums. Lower is more cymbal and more detail; higher is more kit and more room.
- Decide what they’re for. “Cymbal mics” and “kit mics” are different jobs and want different heights. Say which you’re doing before you place them.
- Measure to the snare. Whatever configuration you choose, equal distances to the snare center is non-negotiable.
Room
Skip this in a dead room. In a good one it may be the best track you record.
- Reach for: the MSTC 74 in ORTF six to ten feet back, or the SF-12 in Blumlein for a coincident image that folds to mono perfectly, or an RNR1 pair for the classic dark, compressed room sound.
- A single mono room mic well down the room, heavily compressed, is a legitimate and very old technique. Do not assume stereo is better.
- Check the room mic against the overheads for polarity before you commit.
Part 4 — Setup order
Doing this in the wrong order wastes an hour. This sequence front-loads the decisions that constrain everything else.
- Listen to the kit in the room. Walk around it. Find where it sounds best — that is roughly where a mic wants to go.
- Tune and damp the drums. Everything after this is downstream of the source.
- Place the overheads and get them right alone. Mute everything else. If this doesn’t sound like a record, keep moving them.
- Measure the snare distances. Cable, pinch, swing, adjust.
- Add the kick. Check polarity against the overheads immediately.
- Add the snare. Aim the null at the hat. Check polarity.
- Add toms if you need them. Check 3:1 and polarity for each.
- Add room mics if the room deserves them. Check polarity.
- Set gains with the drummer playing their loudest passage — see Part 4 of the field guide on gain structure.
- Record thirty seconds and listen on headphones before committing to a take. Every problem below is cheaper to fix now than in the mix.
The polarity pass. Before the first real take, solo the overheads, then add each close mic one at a time while flipping its polarity back and forth. Keep whichever sounds fuller. This takes four minutes and is the highest return-on-effort action in drum recording.
Part 5 — When it sounds wrong
| Symptom | Likely cause | Fix |
|---|---|---|
| Kit sounds thin and hollow | Polarity or comb filtering between close mics and overheads | Run the polarity pass; check the snare equidistance |
| Snare sounds splashy and thin | Hi-hat bleed | Re-aim the null; try a figure-8; move the hat |
| Kick has click but no weight | Mic too close to the beater | Move it back toward the reso head, or blend the LoFReQ |
| Kick is boomy with no definition | Too far out, or an untreated corner | Move in toward the beater; move the kit off the wall |
| Cymbals wash over everything | Overheads too low, or aimed at cymbals rather than the kit | Raise them; re-aim at the whole kit |
| Snare wanders off-center | Overheads not equidistant from the snare | Measure again with a cable |
| Toms sound small next to the overheads | Close tom mics fighting the overheads | Check polarity; consider muting the tom mics entirely |
| Everything sounds boxy | The room | Move the kit; add absorption; drop the room mics |
| Sounds like samples, not a kit | Mixing from the close mics | Rebuild the mix starting from the overheads alone |
Quick reference — the ladder at a glance
| Mics | Technique | From our inventory | Fits |
|---|---|---|---|
| 1 | Mono front | sE RNR1, or C414 in cardioid | Anything |
| 2 | Recorderman or spaced pair | NT5 pair or RN17 pair | MixPre-6 II |
| 3 | Glyn Johns | NT5 pair + PG52 | MixPre-6 II |
| 4 | Kick, snare, overheads | PG52 + SM57 + NT5 pair | MixPre-6 II (full) |
| 7 | Close kit + overheads | PGDMK6 + NT5 pair | RMP-D8 |
| 8 | Full, with sub-kick | Above + Solomon LoFReQ | RMP-D8 (full) |
References
- Sound On Sound: reducing hi-hat spill on the snare mic — including why an SM57’s null isn’t quite where you’d expect
- The Glyn Johns method — placement and the cable measurement
- The Recorderman technique — the two-stick measurement and the beater check
- The 3:1 rule — statement and rationale
- Microphone Field Guide — what each microphone in the inventory is, and what happens to the signal after it
How this page was made
I built this guide with Claude, the same way as the Microphone Field Guide, and the same reasoning applies: a page about evaluating what you hear should be honest about how it was written.
What came from me. The equipment, the choice of what to cover, the decision to organize it as a channel ladder rather than a list of techniques, and the editing.
What Claude did. Drafted the prose, checked the technique measurements against published sources — which are linked above — and generated the diagrams. The polar pattern in the snare diagram is computed from the same first-order equation used throughout the Microphone Field Guide; the kit drawings are original line art.
What that means for you. The placement numbers here are starting points that published practice agrees on, not laws. Every one of them should be adjusted by ear in the actual room. If something here contradicts what you hear, trust your ears and tell me — I would rather fix the page than have you doubt yourself.